Options and Additional Information in Navigator Order Entry
There are several places in Navigator Order Management that provide drop down menus with links to additional options and information.
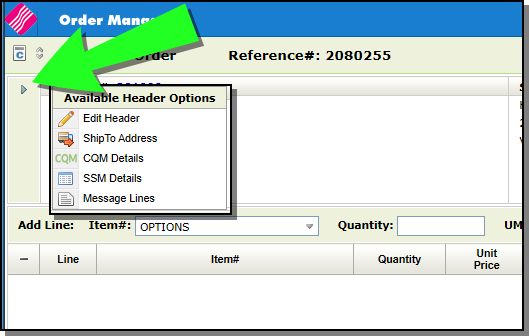
- Available Order Header Options - These options are accessed by clicking on the Order Header options arrow.
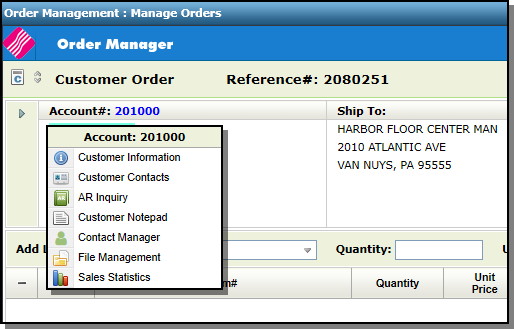
- Account Information - This menu contains information about the active account. It is accessed by clicking the account hyperlink.
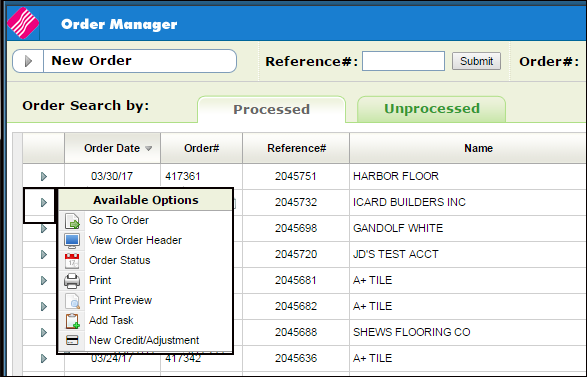
- Available Options from the Options Arrow - These options are accessed via the option arrow during an order search.
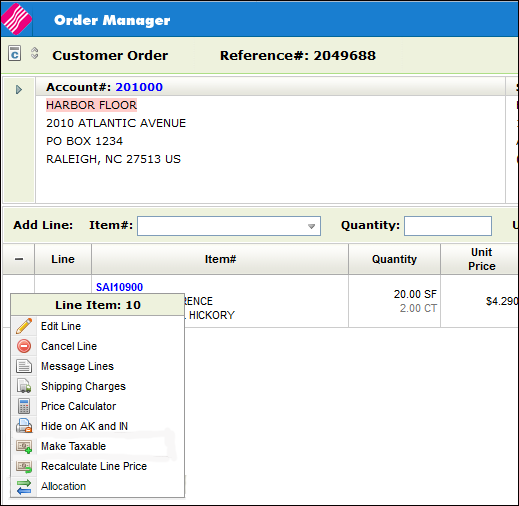
- Line Level Options - These options are accessed by clicking on the options arrow to the left of an order line. These options vary for Processed and Unprocessed orders.
- Available Options Drop Down - The Available Options drop down menu is in the upper right hand corner.
Available Order Header Options
These options are accessed by clicking on the Order Header options arrow.

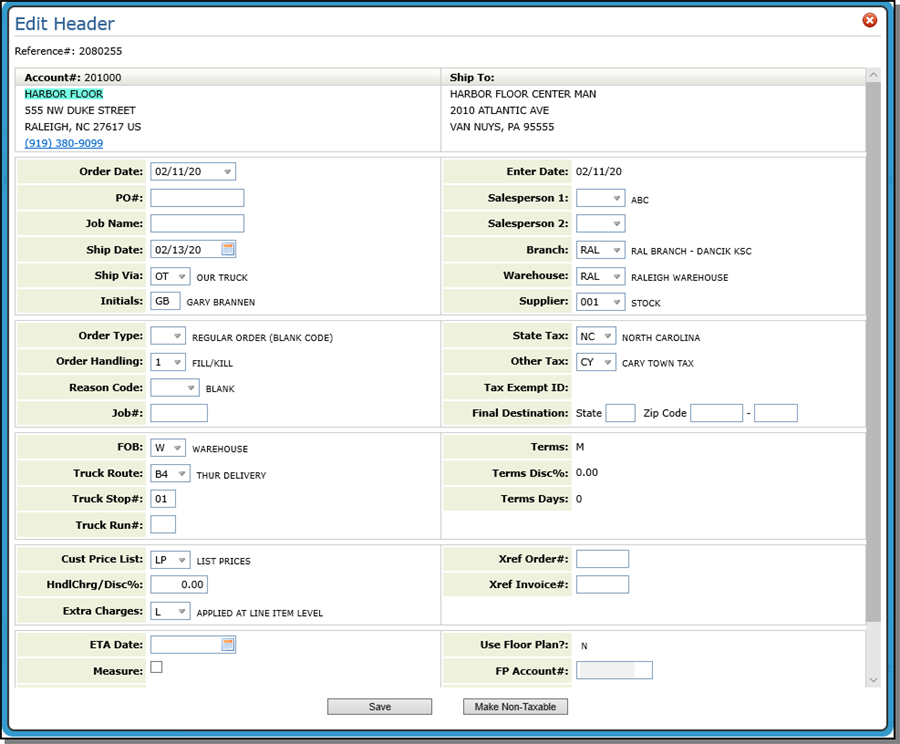
Edit Header - Allows you to add or change information on the Order Header. For more information on the Order Header settings, click here.
Shipto Address - Brings up the Shipto Address window.
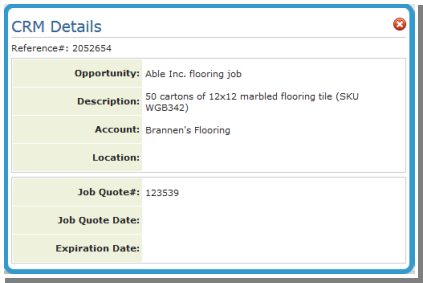
CQM Details - This option allows you to access information about the CQM Job Quotes for the account. It accesses the CQM Details screen that can connect an existing order to an Opportunity before a job quote is selected.
SSM Details - If the account also uses Selection Sheet Manager (SSM), this option allows you to enter the associated Selection Sheet.

The associated Selection Sheet is displayed on the order.

Message Lines - Message lines and charges can be added to an order at the header.
Account Information
This menu contains information about the active account. It is accessed by clicking the account hyperlink.

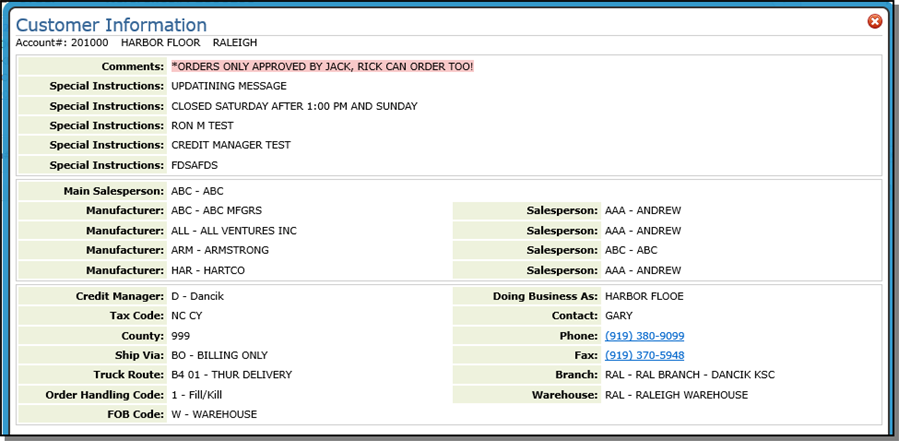
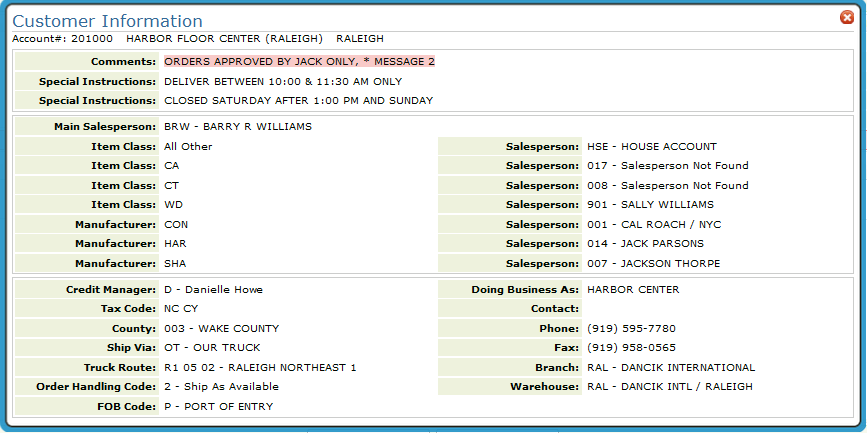
Customer Information - The Customer Information Window enables customer service to view customer information pulled from the Billto File. The window displays the customer's salesperson or salespeople, default ship via, truck route, county, tax codes, comments, phone number, and special instructions.
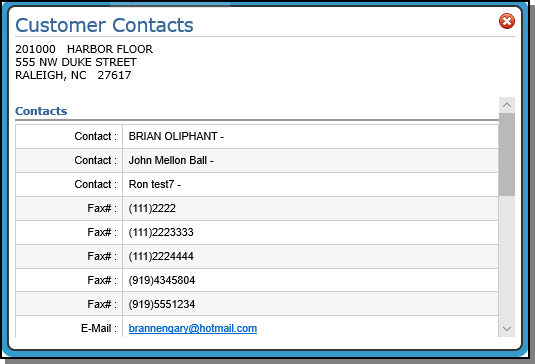
Customer Contacts - Displays the contacts established in the Billto File for the account.
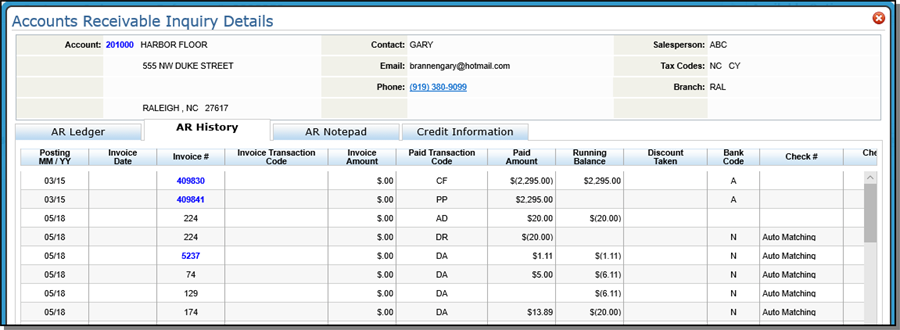
AR Inquiry - Opens up the Accounts Receivable application on the AR History tab. In the Company Settings File (SET 3), you can set the AR History File to store between one and 99 months of history, but the default is set at 24 months. We recommend a 24-month history unless you have enough free disk space to handle more. Also, note that the AR End-of-Month Close final step, Reset Files and Officially End EOM removes old history records. Open transactions are not affected, regardless of their age.
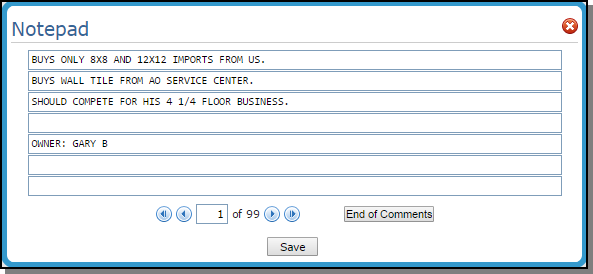
Customer Notepad - Accesses the Billto File Notepad Screen that allows you to enter additional information regarding the customer.
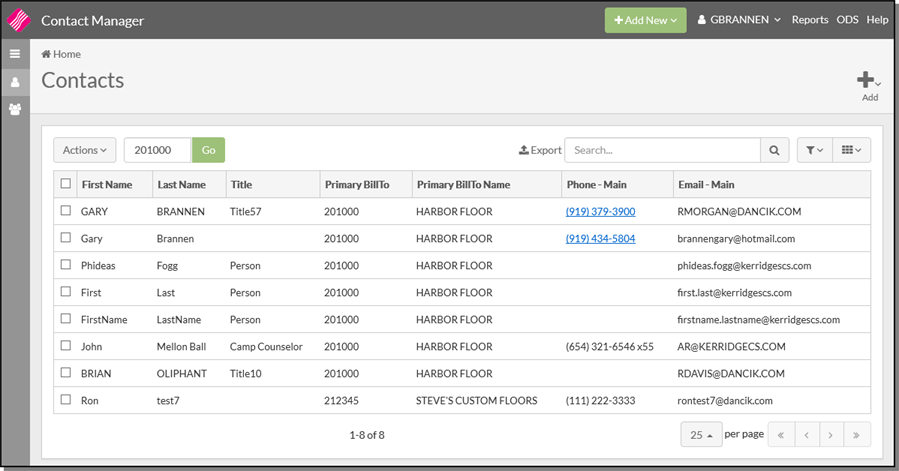
Contact Manager - If access the Contact Manager is granted through the options on the NAV menu this link opens up the Contact Manager Application.
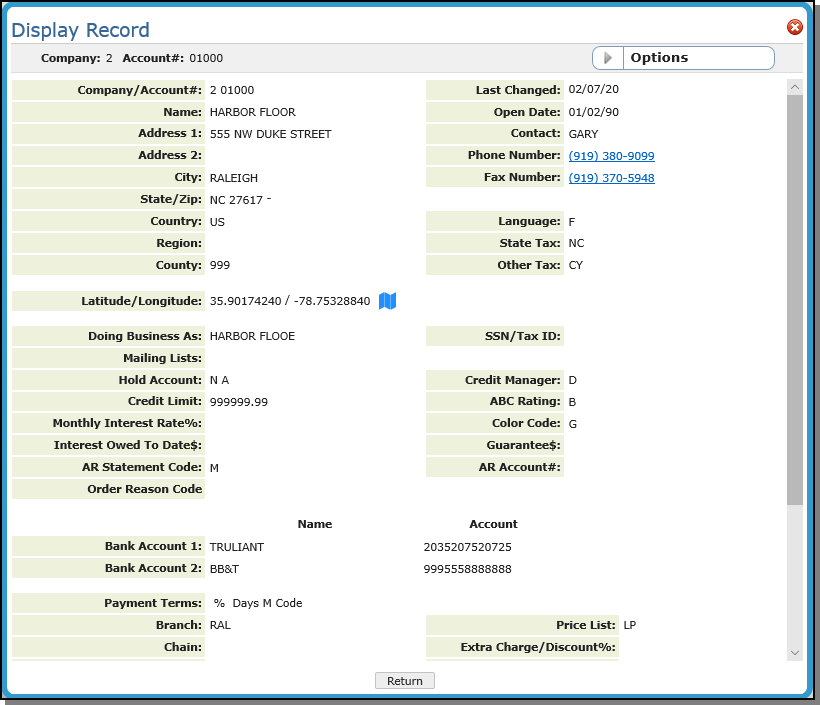
File Management - Opens the Billto File with the accounts information displayed.
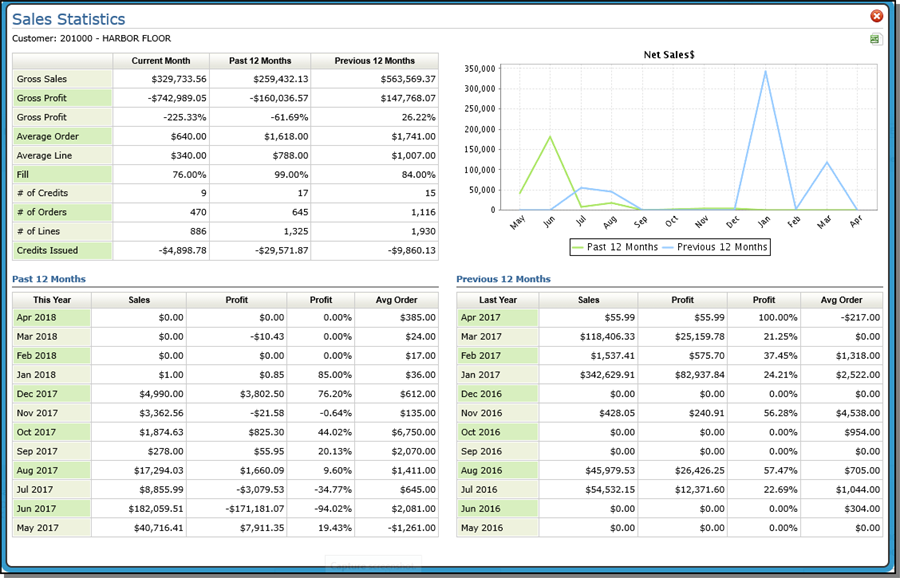
Sales Statistics - Use this option to review current, past (last year) and previous (2 years ago) of prior sales information.
Available Options from the Options Arrow
Click the arrow next to an order to display the Available Options box.

Displays the order.
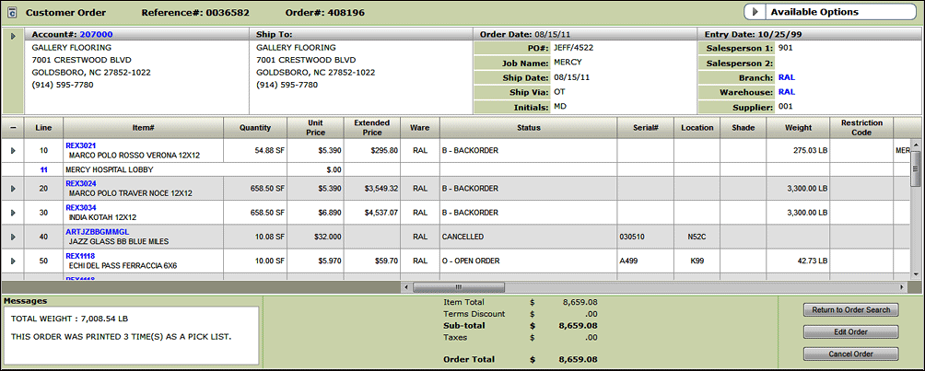
Click an item to access the following information about it:
- Item Details - This screen combines information from the Item (basic item information, packing information and product knowledge information), and Inventory files.
- P.O. & B.O.- Displays the current purchase orders and any existing back orders for the item.
- Inventory - This option allows you to view current inventory levels for the item in different combinations of warehouse, serial number, and location.
- Related Items - This option lets you quickly find alternate, substitute, and complimentary products and create on the fly bills of materials style windows, when no bill of material exists.
- Sales Statistics - Use this option to review current, past (last year) and previous (2 years ago) of prior sales information.For more information about the information available when you click an item, refer to Item Information
Opens an inquiry only version of the Order Header.
The option allows you to inquire on and/or update the status and shipping dates of customer orders and purchase orders including ship dates on lines that will not actually ship - such as labor/expense items and credit memos.
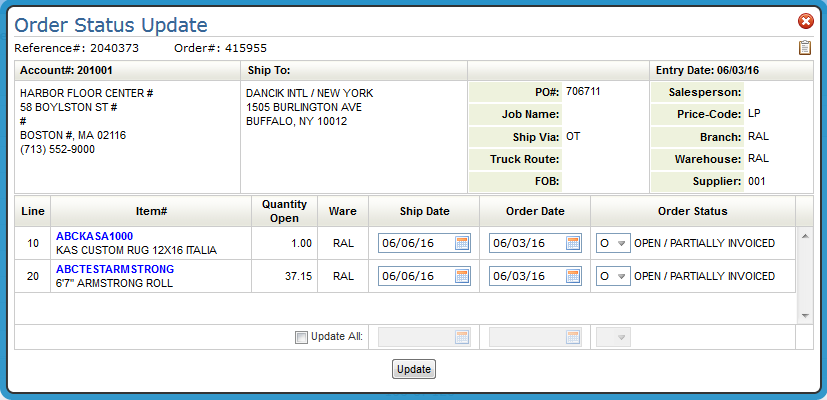
The Ship Date, Order Date and Order Status can be changed on each individual line or the whole order can be changed by using the Update All feature.
Order status should be updated in a logical sequence. You may have particular situations to address at your company and want to assign a new or altered meaning to these status codes. This is perfectly acceptable as long as the new meanings are documented for your staff.
The following example shows the logical flow of an order through the system for a Regular In-Stock Customer Order:
- Order entered, print pick list. Status = blank or O.
- Order picked. Status changed to X.
- Order placed in staging area awaiting delivery or pick up. Status changed to A.
- Order delivered or picked up. Status changed to S.
- Order invoiced. Status automatically changed to # for closed.
The example above may be too detailed for many warehouses, especially without bar codes and scanners, but the sequence illustrates how the status codes can be effectively utilized.
Associated Files:
- Order Status Codes Changes in Order Entry- This setting enables you to list the order status codes that are valid within the Order Entry program.
Brings up several printing options that vary by the type of order.
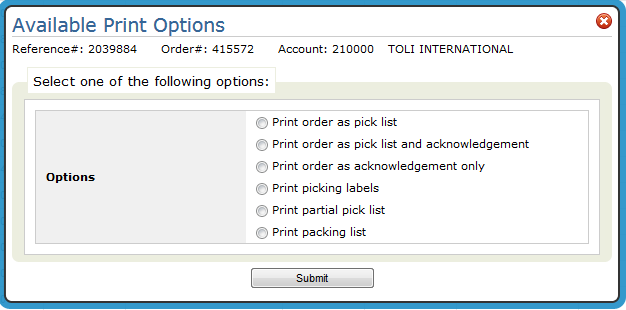
Here are a few notes on printing:
Output can be sent to a printer or an out queue (OUTQ).
- If the OUTQ is attached to an actual printer or print device, a hard copy is produced.
- Printer and form codes are specified on page 3 of the User Web Control Panel File Maintenance (NAV 5 option Y).
- If an OUTQ that is not connected to a printer is used, the report can be accessed in one of the following locations:
- The ODS link in the upper right-hand corner.
- Under the user's OUTQ that started the Print Order job (labeled PRTORDCL under subsystem QBATCH) (via SYS 502). Follow these steps to check:
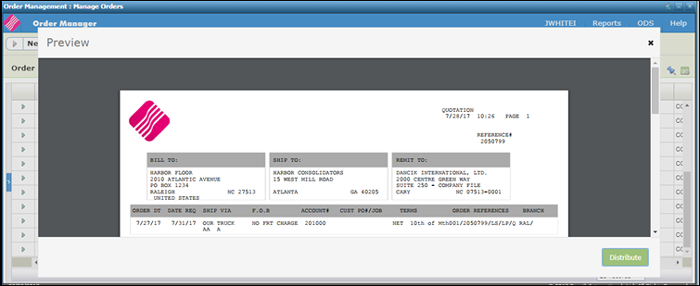
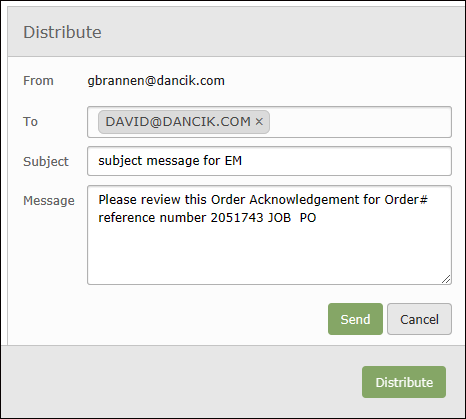
Adds an ODS distribution option to the Print Preview page in Order Entry. This gives you the ability to email a quote for an unprocessed order.
Click Distribute on the order Preview screen...
...and fill in the distribution settings.
This option allows you to add a task to Microsoft Outlook via the Order Management.
Scheduling Outlook Tasks from Within Navigator Order Management
Activating
This functionality can be activated at the Global, Authority Class, or User level. The activation process is essentially the same for all three levels. For the purposes of this example, we are going to activate this functionality at the Authority Class level.
- Access menu option NAV 2 - Work with Authority Classes.
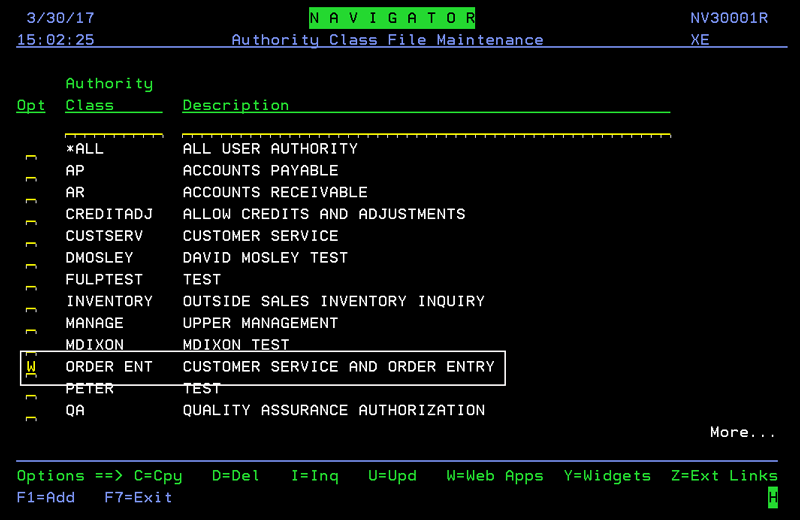
- Enter a “W†in the Opt field of the Navigator Authority Class you want to work with.
-
Press Enter to display the available web apps.
-
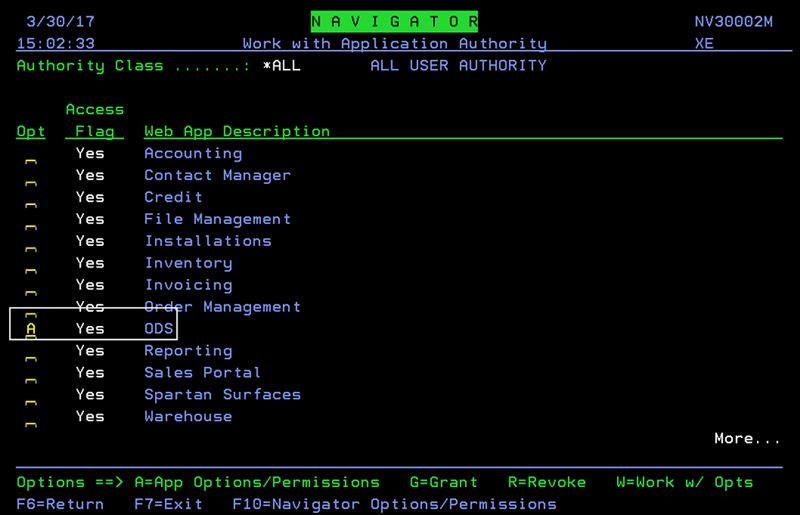
Enter an A into the Opt field for ODS.
-
Enter a Y to activate the setting Allow the ability for creating scheduler tasks, in 3rd party email serv.

Set-up
Settings within menu option ODS 21 contain a user's Exchange credentials. Tasks are created at the user level on the Exchange server based on these credentials. The newly created task will update to the user's Outlook client during the next sync.
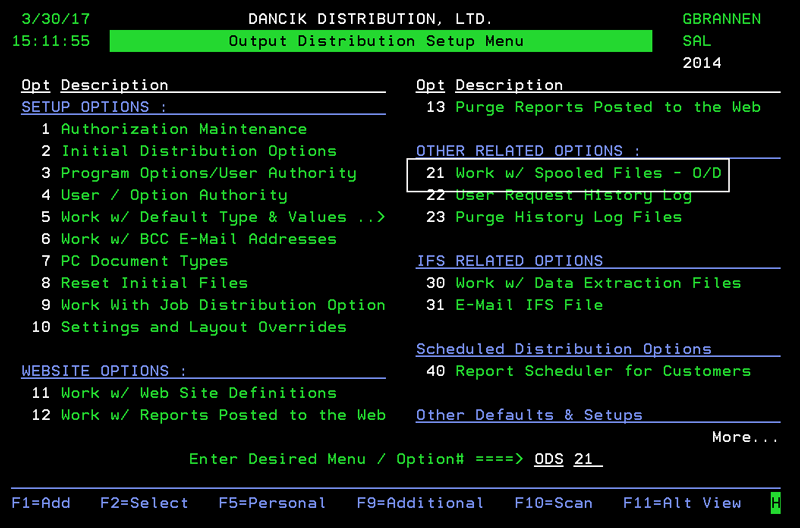
- Access menu option ODS 21 - Work w/ Spooled Files - O/D off the Output Distribution System (ODS) menu.
-
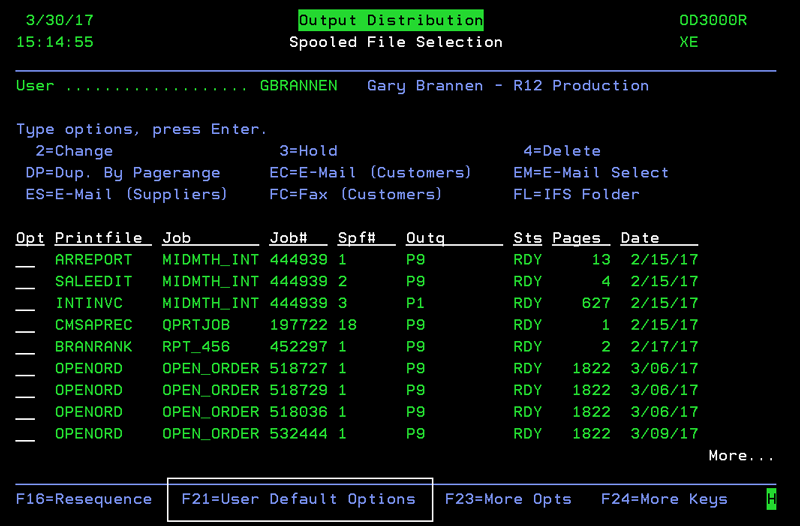
On the screen that appears, press F24 (Shift + F12) to access more function keys.
-
Press F24 again to access more functions. The F21=User Default Options function appears.
-
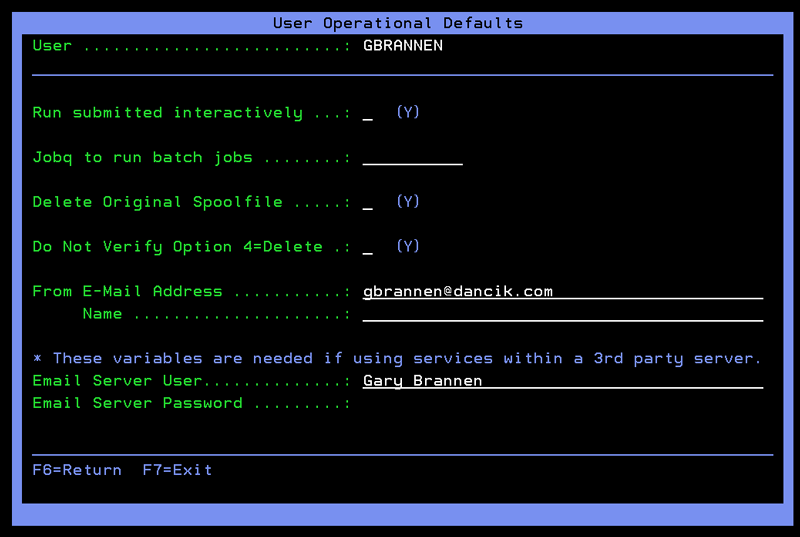
Press F21 (Shift + F9) to access the User Operational Defaults screen. The two settings are located at the bottom of the screen.
-
Enter the user's Microsoft Exchange user name and password in the Email Server User and Email Server Password fields.
If a user tries to create an Outlook task in Navigator and the User Name and Password are not filled out, they will receive a prompt to enter a user name and password.
Scheduling Outlook Tasks from Within Navigator Order Management
- Access Navigator Order Management.
- Enter some search criteria to populate the order table.
- Click the Available Options arrow to the left of an Order.
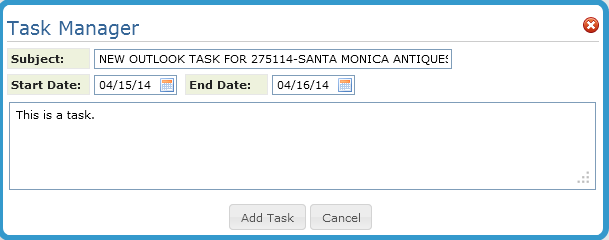
- Select Add Task. The Task Manager window appears.
-
Enter a Subject, a Start and End Date and any comments related to the task.
-
Click Add Task.
-
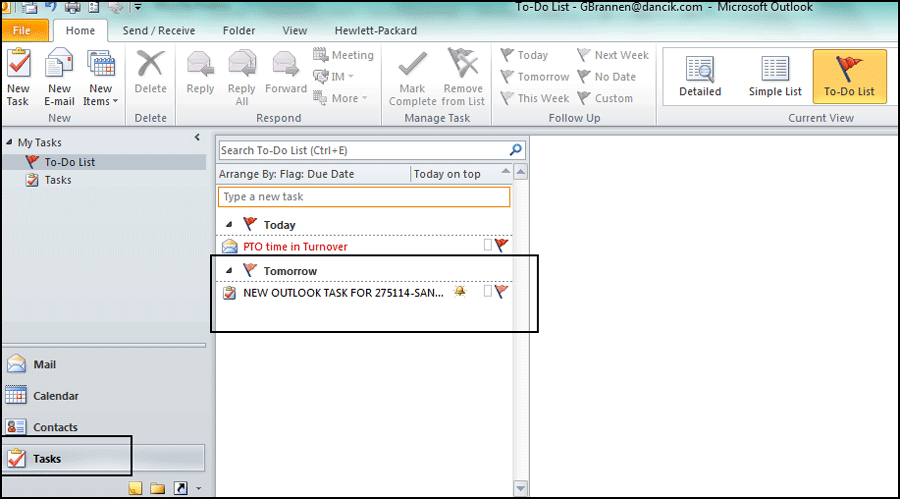
The new task can be accessed via the Task section of Outlook.
This option allows you to credit order lines that have been invoiced. Keep in mind that orders have to be invoiced before credits can be issued against them.
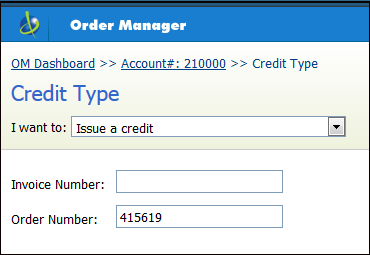
For more information on this option, refer to Working with Credits .
Line Level Options
These options are accessed by clicking on the options arrow to the left of a line.
The options can vary between Unprocessed and Processed orders.

Message Lines and Miscellaneous Charges
Price Analysis and Discount Calculator
Edit Line
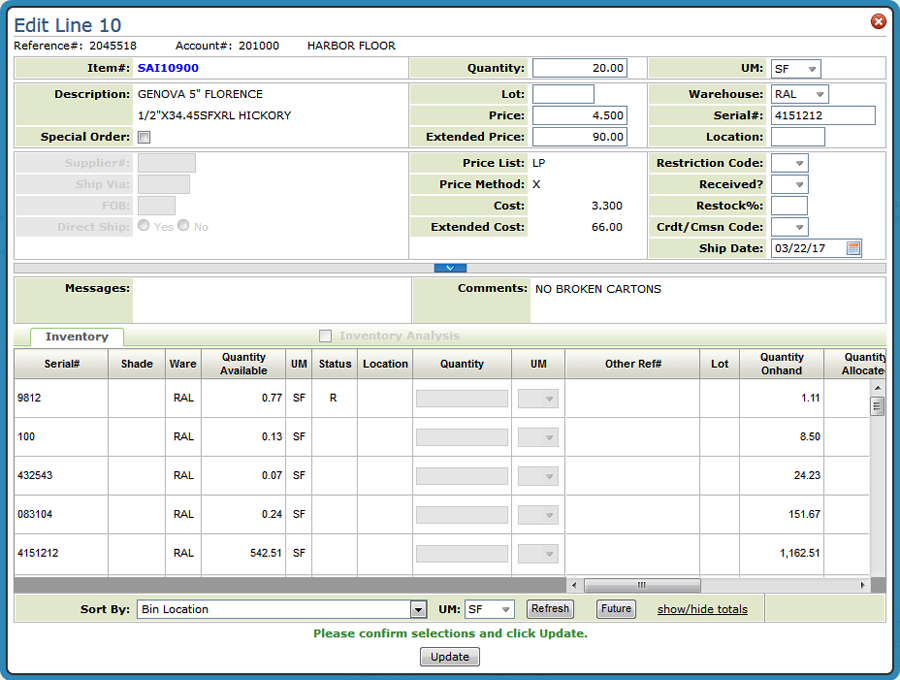
This options brings up the information for an existing order line.
Some of the settings, such as Price, require permission to be able to manually change them. Permission to manually change prices has to be granted via the Allow Price Override setting in the Order Management Application Permissions. Accessed via the options on the NAV menu.
Cancel Line
When an order line is canceled, an email can be sent out. Refer to Sending an Email when an order line is canceled for more information.
Hiding Lines from Printing
This line level option allows you to toggle between Hide on AK and IN and Show on AK and IN.
If the line is hidden, a no print icon ( ) appears next to the option arrow.
Hiding or Showing a line does not impact the calculation of the order totals.
When the hidden line is invoiced, the Invoicing application also shows the hidden icon for the line.
Price Analysis and Discount Calculator
This tool allows you to:
- Override the price of a line item by entering a new price value.
- Apply a discount percentage to a specific line item price.
- Calculate a new price based on a targeted gross profit percentage.
- View the description of the price lists, restriction codes, promotions, and funds that make up a given price.
Granting Access
As with most Navigator enhancements, access has to granted through the Navigator Menu.
There are three levels of granting access:
- NAV 1 - Work with Global App Defaults - This one grants access to everyone. Follow this path: NAV 1>"A" for Order Management>"Y" for Allow Price Calculator.
- NAV 2 - Work with Authority Classes - Authority classes allow you to group users together, they can be created based on system access restrictions or on a user's functional areas such as AP clerk, order clerk, or customer service. They allow you to customize the level of access a group of users has within Navigator. Authority classes override global settings. To grant access at the authority class level follow this path: NAV 2 Work with Authority Classes >"W" for the appropriate authority class>"A" for Order Management>"Y" for Allow Price Calculator.
- NAV 5 - Control User File Maintenance - This option grants access at the user level. It overrides the Authority Class settings. Follow this path: NAV 5 - Control User File Maintenance>"W" for the appropriate user>"A" for Order Management>"Y" for Allow Price Calculator.
Using the Price Analysis and Discount Calculator
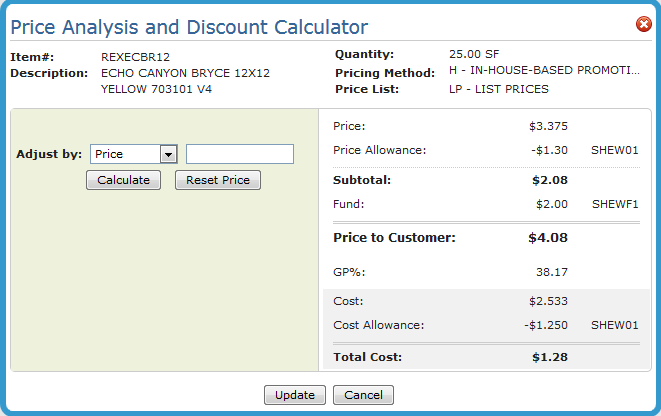
Use the Adjust by drop down to adjust the price by:
- Price - The list price is displayed here. Entering a new price value updates the current price and adjusts the GP% accordingly. You can restore the original price, after it is overridden, by clicking Reset Price.
- Discount% - The discount% is always set to zero when the screen is first displayed. This field is separate from the header discount% field. You can enter a discount%, which recalculates the price and GP%. A negative value, -10.00 for example, can be entered.
- GP% - Entering a new GP%, recalculates the price. A negative value (for example -10.00) can be entered.
The Price Allowance and Fund figures come from the Promotional File. Promotions can be created for several parameters. In this example, the Price Allowance of -$1.30 comes from a promotion set up for the manufacturer; REX. The Fund amount of $2.00 comes from a promotional file based on the item.
Select an Adjust by method, enter the new value and click Calculate to update the pricing information.
You can adjust the pricing as much as needed. Every time you enter a pricing override, be it by Price, Discount% or GP%, the adjustment is made against the original price from the order. Once you click Update, the pricing on the order changes and that becomes the new "original" pricing.
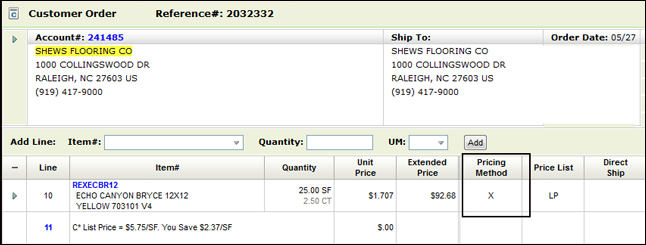
The repriced line is assigned a Pricing Method of "X" which signifies the pricing was overridden.
Make Taxable
The tax status of the line can be changed by clicking the line options arrow and selecting Taxable/NonTaxable.
Recalculate Line Price
This option reset pricing to the "default" pricing at either the line or order level.
Default Pricing takes in account pricing and fund promotions, points, terms and other pricing strategies.
Notes:
- at the line level - only available in Order Edit.
- Available regardless of user authority based on the new setting; Allow Price Overrides.
- Only works for open lines
- Not available for canceled or closed lines (lines in # status).
- A notepad entry is made indicating a line/order price recalculation was performed.
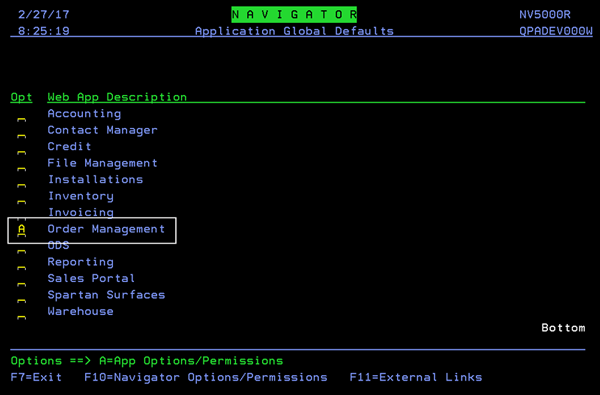
You can grant or deny manual pricing override authority at the Global Level (NAV 1), the Authority Class Level (NAV 2) or the User Level (NAV 5).
-
The setting, Allow Price Overrides, is accessed via the Order Management - Work with Application Permissions screen.
- Use the "A" App Options/Permissions option to gain access to the setting.
Allocation
Provides the ability to allocate inventory from an order line to fill a back ordered line. Available inventory can also be displayed and selected.
Allocating Inventory to Back Ordered Lines
Associated Files
Web Services
- getItemInventory,
- deallocateOrderLine,
- allocateOrderLine
- getItemAvailAllocQty web services.
Navigator User - Control File (NAV 5)
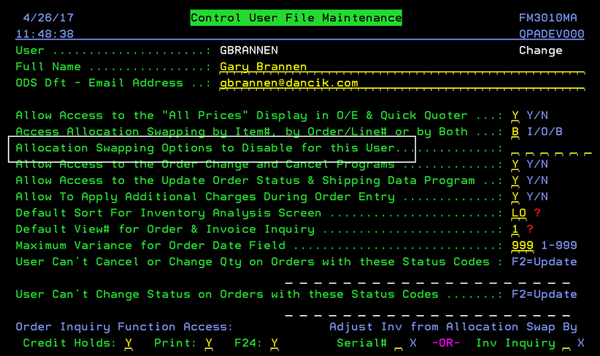
The option Allocation Swapping Options to Disable for this User controls if a user can allocate or deallocate inventory. If an "A" is entered into the setting the user cannot perform allocation and if a "D" is entered deallocation is unavailable to the user.
Allocation Swapping Defaults
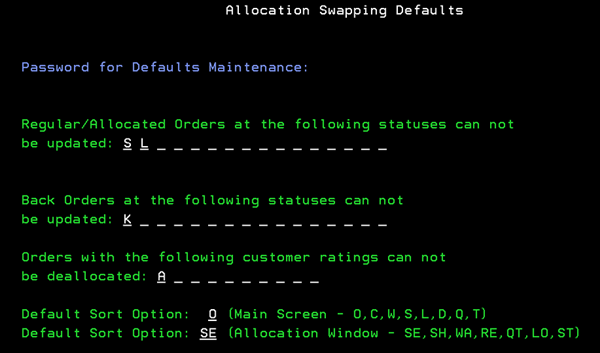
The Swapping Defaults Screen establishes the defaults for allocations.
Path: CUS19 or ORD 19>F9
Allocating Inventory to Back Ordered Lines
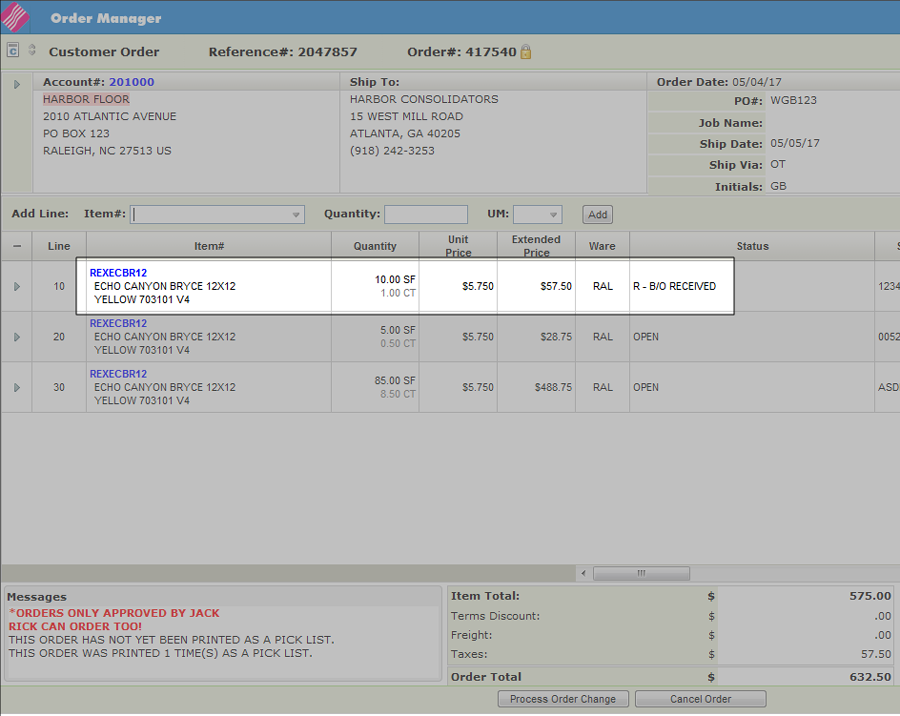
- Access Order Management and open a Processed order.
- Click Edit Order at the bottom of the window.
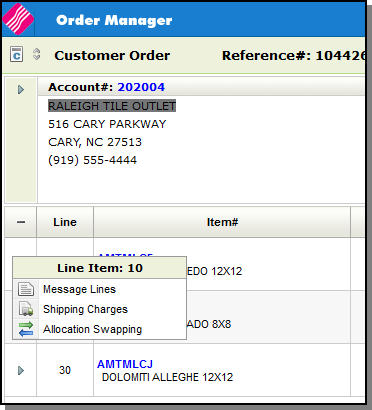
- Click the option arrow to the left of a backordered line and select Allocation.
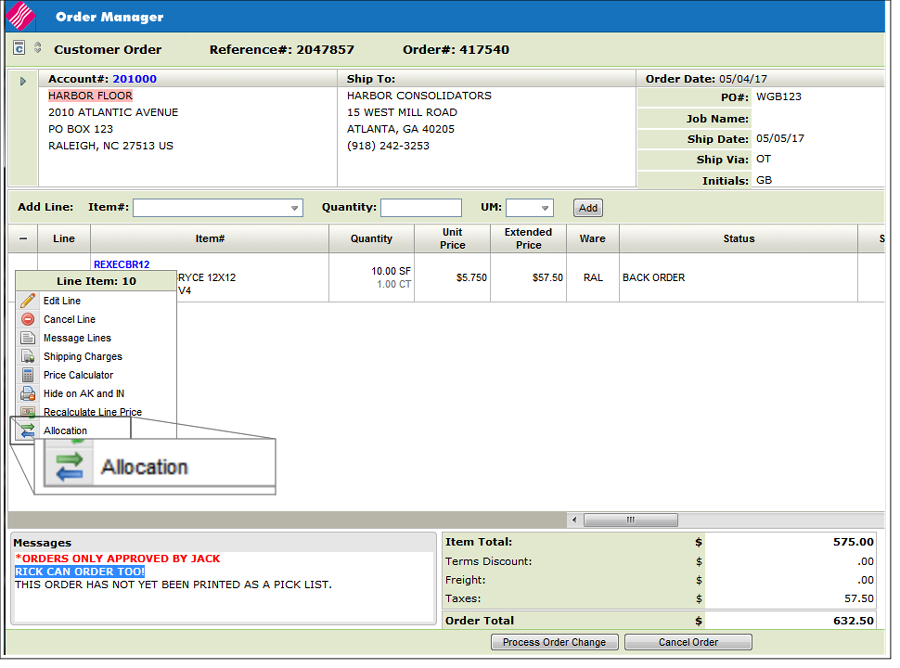
The Allocation window appears.
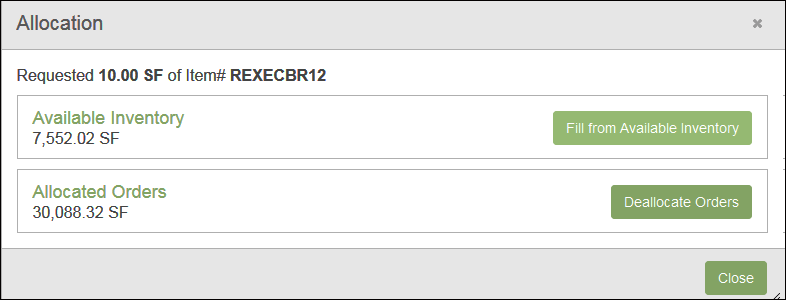
Fill From Available Inventory
This option shows the Total Available inventory in the warehouse(s) the user has access to.
The default inventory selection technique is based on the user's control panel setting for the Auto-ISO Option (NAV 5, option "Y", page 2).
- If Auto-ISO is Y the default is ISO.
- If Auto-ISO is N the default is Manual Selection.
- If Auto-ISO is M the default will be ISO and the Manual Selection is unavailable.
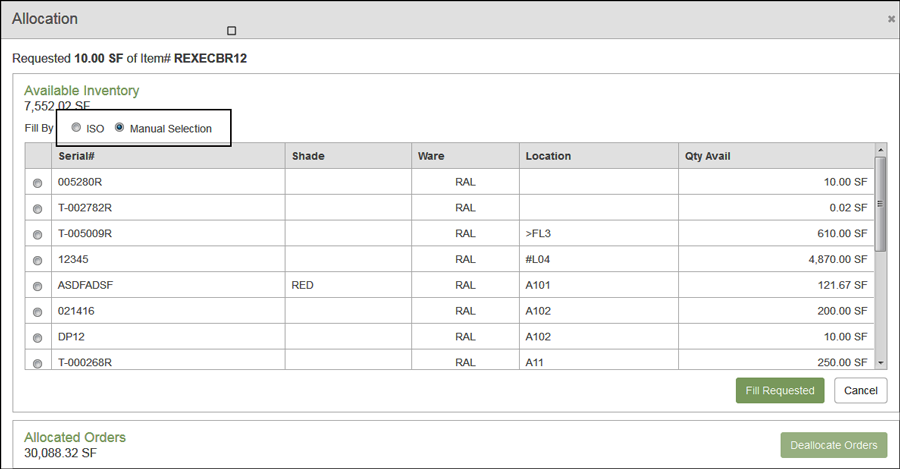
Manual Selection - (shown above) Click on a Serial# to fill the back order. Only one serial number can be selected. If there is not enough inventory available from the selected serial number to fill the order line, an error message appears.
ISO - The ISO inventory selection is displayed. You can either click Fill Requested to use the ISO recommendation or Cancel to not allocate any inventory and return to the order line. If ISO suggests more than one serial number to fill the back order, the line is split into multiple lines. If the line being filled is not the last line on the order, the multiple lines will not be together on the order.
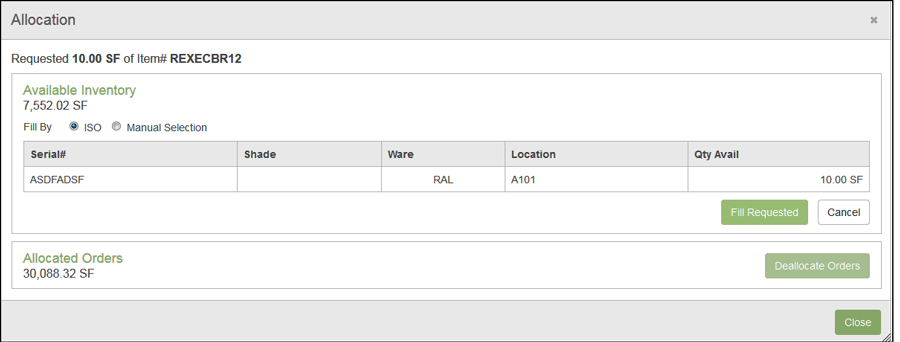
Both options have a Fill Requested button, click it to add the selected inventory to the order line and change the status of the line.
Deallocate Orders
This option borrows inventory allocated to other orders and allocates them to this order.
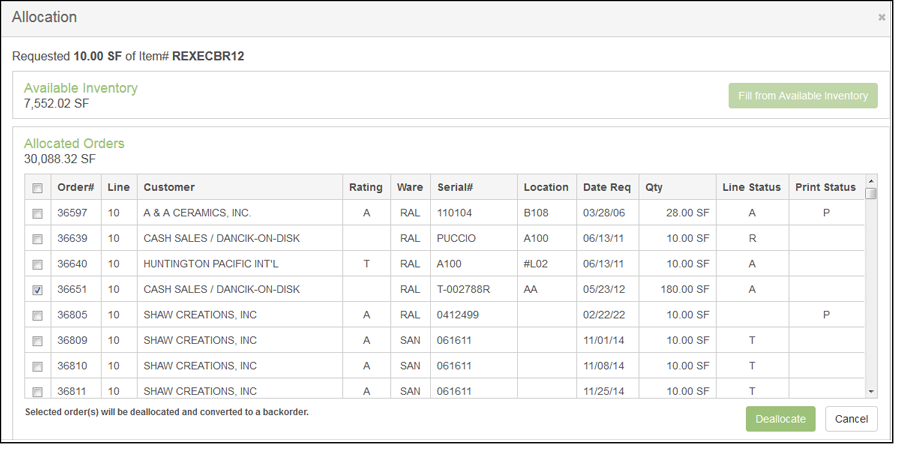
Select the orders to deallocate inventory from and click Deallocate.
Notepad entries are written for the deallocated orders.
Message Lines and Miscellaneous Charges
Splitting Order Lines
This feature allows you to split an order line item into two order line items, each with part of the total quantity.
Order lines can only be split on processed orders.
The following are situations were an order line cannot be split:
- An item on the line has a no break (NB) item policy
- The order line has been invoiced
- The order line is on backorder
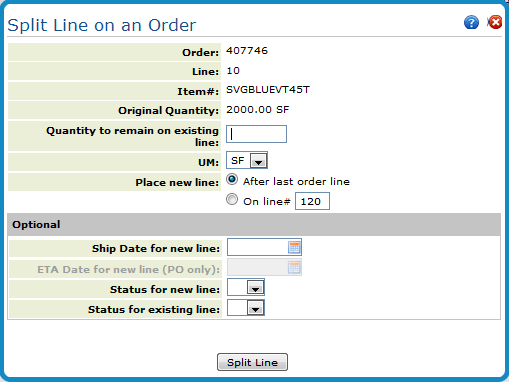
Selecting the Split Line option displays the Split Line on an Order window.
| Field | Description |
| Required Entries | |
| Quantity to remain on existing line. | Enter the quantity remaining on this line number, after the line is split. The difference is put on the new line created when the line is split. |
| Unit of measure | Select the UM related to the quantity stated above. |
| Place new line |
Controls the line# of the new line.
|
| Optional Entries | |
| Ship Date for new line | Optionally enter a ship date for the new line. Leave this field blank for the ship date on the new line to remain the same as the existing line. |
| ETA Date for new line (PO only) | Leave this field blank for customer orders. |
| Status for new line | Optionally enter a status code for the new line. Leave this field blank for the status code on the new line to remain the same as the existing line. |
| Status for existing line. | Status codes allow you to identify the status of each line of each order as it moves throughout the system and your warehouses. |
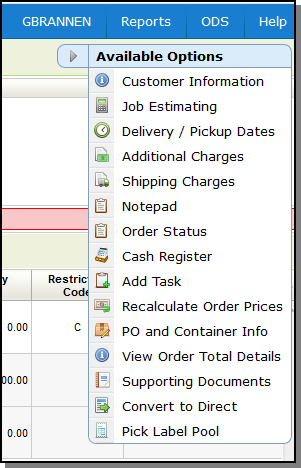
Available Options Drop Down
The Available Options drop down menu is in the upper right hand corner.

The Customer Information Window enables customer service to view customer information pulled from the Billto File. The window displays the customer's salesperson or salespeople, default ship via, truck route, county, tax codes, comments, phone number, and special instructions.
This feature allows you to track estimated job totals and estimated job costs against actual billing and costs. This is primarily for commercial projects in which Work In Progress (WIP) reporting and accounting is required. You can enter, update, or inquire on costs and estimates.
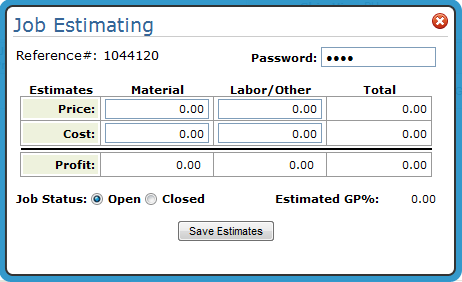
Enter the information as follows:
- Price Estimates - Enter an estimate for the material and/or labor. This is an estimate for what you are going to charge your customer for the material and/or the labor. After entering material and/or labor prices, the system automatically totals them.
- Cost Estimates - Enter your material and/or labor costs. After entering material and/or labor costs, the system automatically totals them.
- Profit Estimates - After entering both price and cost information, the system automatically calculates the profit estimates.
- The Estimated Gross Profit percentage is automatically calculated.
- Flag the order as Open or Closed. This information is used as a parameter of the Work in Progress report, but has no effect on the order itself.
This window provides delivery information for the items on the order.
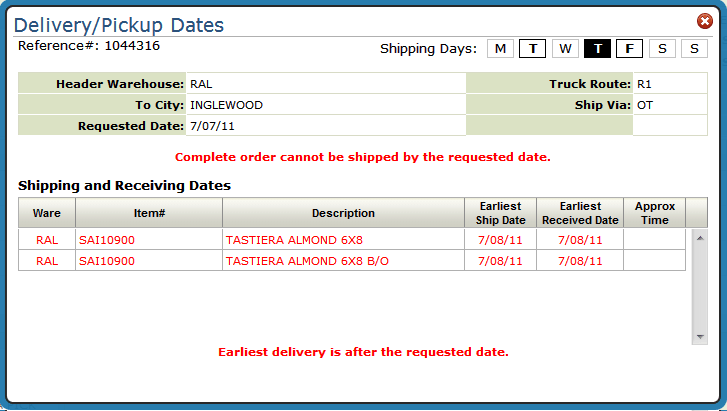
The system consults other parts of the system to calculate the best ship dates:
- Routes file for the number of days that are added based on the Customers specific truck route. If back ordered items are received and available by a certain day of the week (and cutoff time), the program adds that number of days to the expected delivery. If items need to be transferred, the program adds the transfer time.
- The Interwarehouse Transfer File to consider how long it takes the inventory to move from one warehouse to the warehouse it will ship from.
- Order Handling Codes - Some order handling codes such as code 5 for MUST SHIP COMPLETE automatically prevents shipment of orders until the last back order has been received.
- Order handling codes are assigned to an order on the order header.
- A default order handling code can be assigned to a customer through the Customer Preference File.
- Order handling codes are created and maintained in the ORDERHAND table accessed via menu option SET 29.
Brings up several printing options that vary by the type of order.

Here are a few notes on printing:
Output can be sent to a printer or an out queue (OUTQ).
- If the OUTQ is attached to an actual printer or print device, a hard copy is produced.
- Printer and form codes are specified on page 3 of the User Web Control Panel File Maintenance (NAV 5 option Y).
- If an OUTQ that is not connected to a printer is used, the report can be accessed in one of the following locations:
- The ODS link in the upper right-hand corner.
- Under the user's OUTQ that started the Print Order job (labeled PRTORDCL under subsystem QBATCH) (via SYS 502). Follow these steps to check:
This option directs the system to search for additional charges that can be applied to the order. Additional charges can be defined in several parts of the system and can be assessed according to branch, state, marketing program, and other criteria. For example, additional charges for “Fuel Surcharges†can be different in each of your branches, different based upon marketing programs, customer account number, etc.
Other examples of additional charges are: carpet freight, estimating charge, installation service fee, will call service fee, and minimum order charge.
When the Additional Charges option is selected a window similar to the following appears.
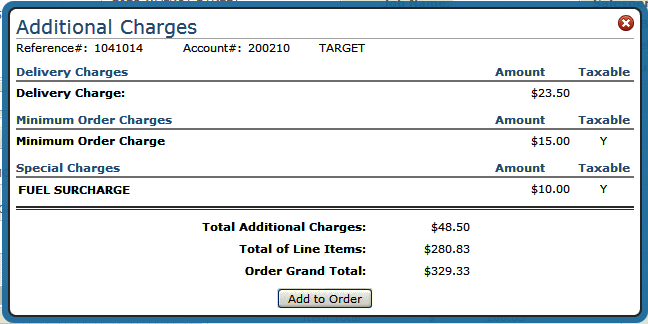
If the Add to Order button is not displaying, you have not been granted permission to add additional charges via Navigator (NAV) menu option 5 - Control User File Maintenance. To access the Allow To Apply Additional Charges During Order Entry setting, enter a U to update a user's setting and then press F11 to access the second page of settings.
Associated Files
- The Special Charge Codes Table is designed to assess additional charges on your invoices, mainly for the purpose of freight and fuel cost recovery.
- Special Charges Formulas Table - enables you to define which customers are affected by each special charge, and how that charge is calculated. The Special Charges Formulas can vary for the same special charge code, based on branch, state, marketing program, and other criteria. For example, special charges for “Fuel Surcharges†can be different in each of your branches, different based upon marketing programs, customer account number, etc.
- Minimum Order Charges File - You can use this file to automatically charge customers a minimum order charge when a single order or a group of orders is less than a specified dollar amount.
- Delivery Charges File - Use this file for assigning and assessing delivery charges. You can use this program to control delivery charges by warehouse, truck route, account number, and state. You can enter varying delivery charges on each of these levels.
- System Wide Setting - Options for Shipping Charges Within Order Entry - This setting includes options to activate the Order Entry Shipping Charge Table, establish rounding options, establish surcharges percentages which can allow you to recover costs such as rising fuel prices.
Shipping charges can be added to an order using one of two methods:
- Via the Additional Options drop down box located in the upper-right hand corner. This option bases the charges across all lines of the order.
- By clicking the arrow to the left of an item. This option bases the shipping charges on this line only.
Both options deliver the Shipping Charges screen.
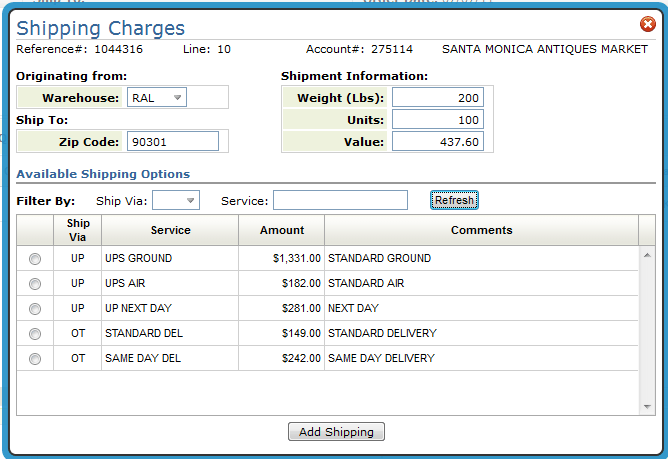
The Ship Via assigned on the Order Header is automatically populated in the Ship Via field. To see all the valid shipping charges, clear out the Ship Via code and click Refresh.
- Use the settings, Weight, Units, and Value to base the shipping rates on. Use them separately or in combination to get a shipping quote. For example, if you have a six line order, but only three lines were ready to ship, you could enter the information (i.e. weight, units or value) from those lines and get a shipping rate just for those three lines.
- The other fields, From Warehouse, Zip/Postal Code, Ship Via, and Service, are limit to fields. Use these fields to narrow your inquiry down as needed.
- Ship via codes represent the method of shipping for the order. Some examples are: UP - UPS, CC (Common Carrier), and OT (Our Truck). If left blank, all Ship Via codes are considered.
- The Service field further defines the method of shipping. For example, for ship via code UP (UPS) there could be several different services such as same day, standard delivery, etc.
Select a shipping charge and then click Add Shipping. You are asked where you want to apply the shipping charge.
- The charges can get added as a miscellaneous line under a specific line number. Or, they can be added as a 9966 line after the last line of the order.
Once order lines get invoiced they cannot be invoiced again. If you choose to add the shipping charges across the entire order (as a 9966 line) and the order gets invoiced, you cannot update or add to the 9966 shipping charge line. However, you can still add shipping charges against individual lines (i.e. line 11 for order line 10) as long as the line being changed has not been invoiced.
The notepad is where you can enter notes about an order. The system also automatically records events such as line status updates, quantity changes, and price changes.
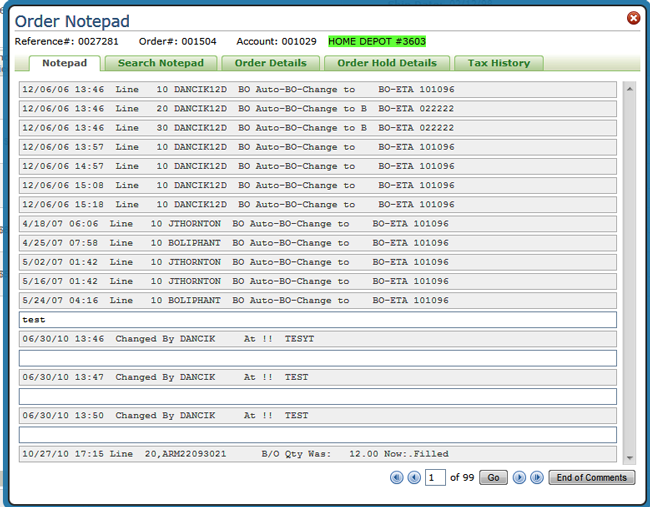
Search Notepad
Preforms a string search through an order's notepad screens. Often the notepad contains pages of data. This scan provides a quick and easy way to find exactly the information needed. Easily find all changes related to a user, a phrase, a date, a line number, etc.
Order Details
This tab displays dates and times related to the creation of an order.
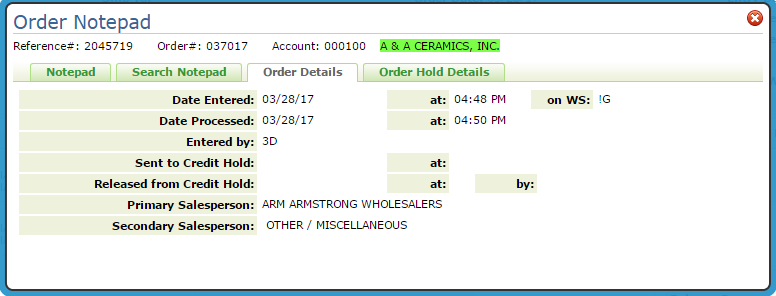
Order Header Was Keyed - Date and time the header screen of the order in the original order entry session was entered. For EDI orders, it is the date and time the EDI order entered the system. Special Workstation Codes:
- !G - Navigator Order Management order
- !! - Decor 24 order
- !I - Order was generated in Image Builder
- !S - Order was generated in Selection Sheet Manager
Order Was Processed - The date and time the order was assigned an order number and processed, but the order was not necessarily printed. If the order was originally a hold, this could be a different date than the date the header was created.
Order Was Entered By - This is the initials and name of the person who keyed the order. If there are initials, but no name, then the name is not defined in the Classification Codes File.
Sent To Credit Hold - This is the date and time the order was sent to credit hold, if it was sent to credit hold.
Released from Credit Hold - This is the date and time the order was released from credit hold; if it was released. The initials or authorization code for release are also shown.
Primary Salesperson and Secondary Salesperson - The Salesperson initials are pulled from the Salesperson field on the Order Header screen. The full name is pulled from the Salesperson File.
Order Hold Details
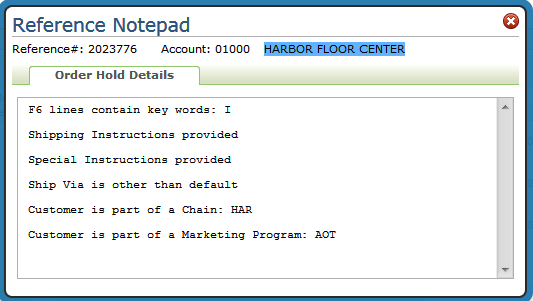
Associated Files
- System Wide Setting - Options for Order Hold Process
- Conditional Order Release in Decor 24
- Sales Portal
- Navigator File Management - Order Hold Reason Codes
The Multi-Unit Order Entry option includes several features to facilitate the needs of our customers who service large commercial business on multi-unit commercial and residential properties. For more information, refer to Multi-Unit Orders.
The option allows you to inquire on and/or update the status and shipping dates of customer orders and purchase orders including ship dates on lines that will not actually ship - such as labor/expense items and credit memos.

The Ship Date, Order Date and Order Status can be changed on each individual line or the whole order can be changed by using the Update All feature.
Order status should be updated in a logical sequence. You may have particular situations to address at your company and want to assign a new or altered meaning to these status codes. This is perfectly acceptable as long as the new meanings are documented for your staff.
The following example shows the logical flow of an order through the system for a Regular In-Stock Customer Order:
- Order entered, print pick list. Status = blank or O.
- Order picked. Status changed to X.
- Order placed in staging area awaiting delivery or pick up. Status changed to A.
- Order delivered or picked up. Status changed to S.
- Order invoiced. Status automatically changed to # for closed.
The example above may be too detailed for many warehouses, especially without bar codes and scanners, but the sequence illustrates how the status codes can be effectively utilized.
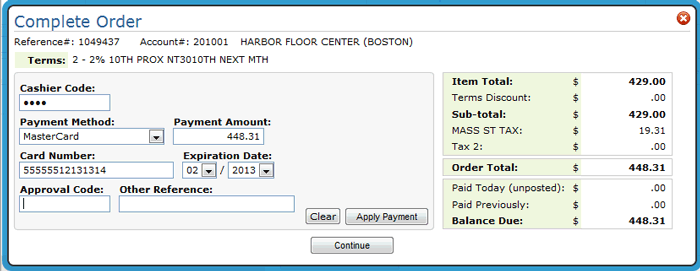
This available option allows you to access the cash register window from anywhere in Order Entry.
For more information, refer to Entering Orders
This option allows you to add a task to Microsoft Outlook via the Order Management.
For more information refer to Scheduling Outlook Tasks from Within Navigator Order Management.
This option resets pricing to the default pricing.
Default Pricing takes in account pricing and fund promotions, points, terms and other pricing strategies.
Notes:
- Available regardless of user authority based on the new setting; Allow Price Overrides.
- Only works for open lines
- Not available for canceled or closed lines (lines in # status).
- A notepad entry is made indicating a order price recalculation was performed.
You can grant or deny manual pricing override authority at the Global Level (NAV 1), the Authority Class Level (NAV 2) or the User Level (NAV 5).
-
The setting, Allow Price Overrides, is accessed via the Order Management - Work with Application Permissions screen.
- Use the A - App Options/Permissions option to gain access to the setting.

- Access a processed order.
- From the Available Options drop down, in the upper right hand corner, select PO and Container Info.
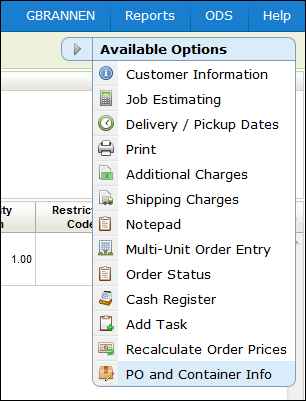
The PO and Container Info window appears.

|
Field Name |
Description/Instructions |
|
Vessel |
Enter the vessel name or other name/code which identifies a single shipment. For example, ABC 11/93 could be entered to indicate the November 1993 shipment from supplier ABC. Assigning a vessel name or code to your incoming shipments and even to the customer back orders placed against these shipments gives you a powerful tool for updating order status and dates. Using option 15 on the Purchase Orders Menu, you can update all orders related to the vessel in a single entry. |
|
Docs# Container# |
Use these fields to enter bill of lading and container numbers. |
|
Notes |
Enter short comments, such as 6 pallets, here. These notes and all other fields on this screen can be included in the purchasing spreadsheets available on the Purchasing and Receiving Reports Menu. |
|
Port ETA |
For imports, enter the estimated time of arrival date to the port of entry. This is in addition to the regular ETA field which represents the date of arrival in your warehouse. |
|
Port |
For imports, you can enter a three-character abbreviation for the port or city of arrival. |
You can update fields individually or you can update the entire order at once through the Update All settings.
Associated Files
System Wide Setting - Options For Vessel Container System - Using this system wide setting you can change the default titles on the Vessel/Container Search and Inquiry Screen, and on related reports.
This option provides a view to get order totals including invoiced lines.
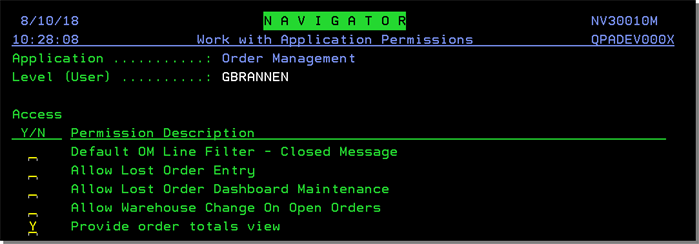
The setting Provide order totals view needs to be activated.
With this setting enabled, the View Order Total Details link is included in the Available Options drop down.
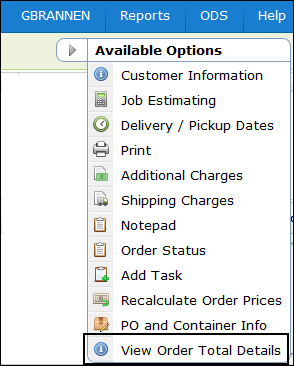
When you click View Order Total Detailsthe Order Total Details popup displays.
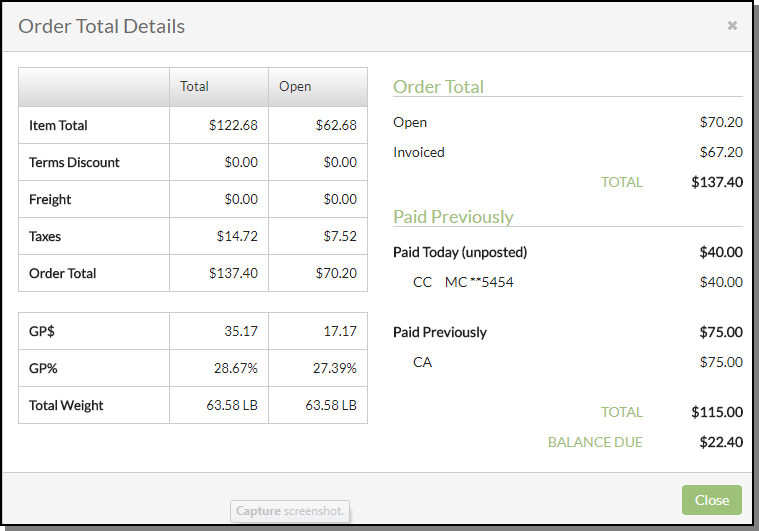
The Order Total Details popup shows three sets of information
- Both the full order total and the open order total breakdown for the order in grid form.
- The current open order total amount and the total of invoices generated from the order.
- A display of payments that have been taken and the current balance due.
Associated Files
- Payment Method Maintenance - ACT 115 - This option allows you to define your own payment method codes to control how payments are entered on the Cash Register screen and reported at the end of the day.
This option allows you to change the warehouse on processed and unprocessed orders from a stock warehouse to DIR.
Navigator Menu Options
The setting Allow conversion of stock orders to direct ship was added to the Application Permissions on the Navigator options 1, 2 and 5.
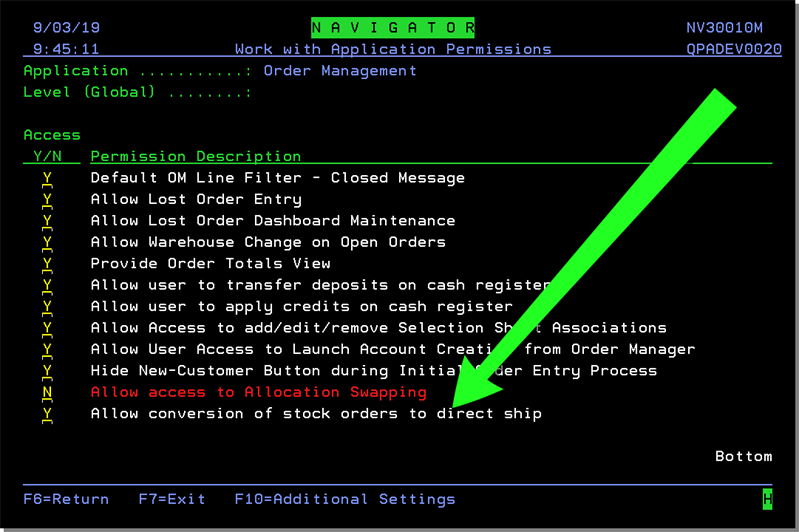
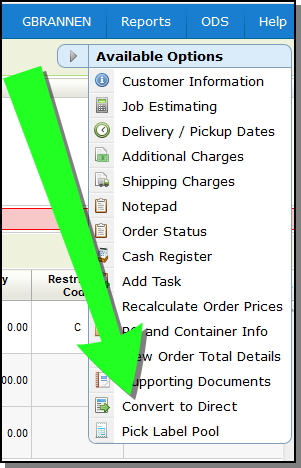
If the setting is activated the option Convert to Direct is added to the Available Options in Order Management when:
- In order change
- The order is not already a direct (supplier = 001), or a purchase order (account = 00001) and not a credit (order type = C)
Selecting Convert to Direct displays a popup allowing you to enter a new supplier.
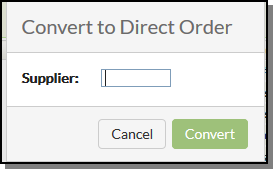
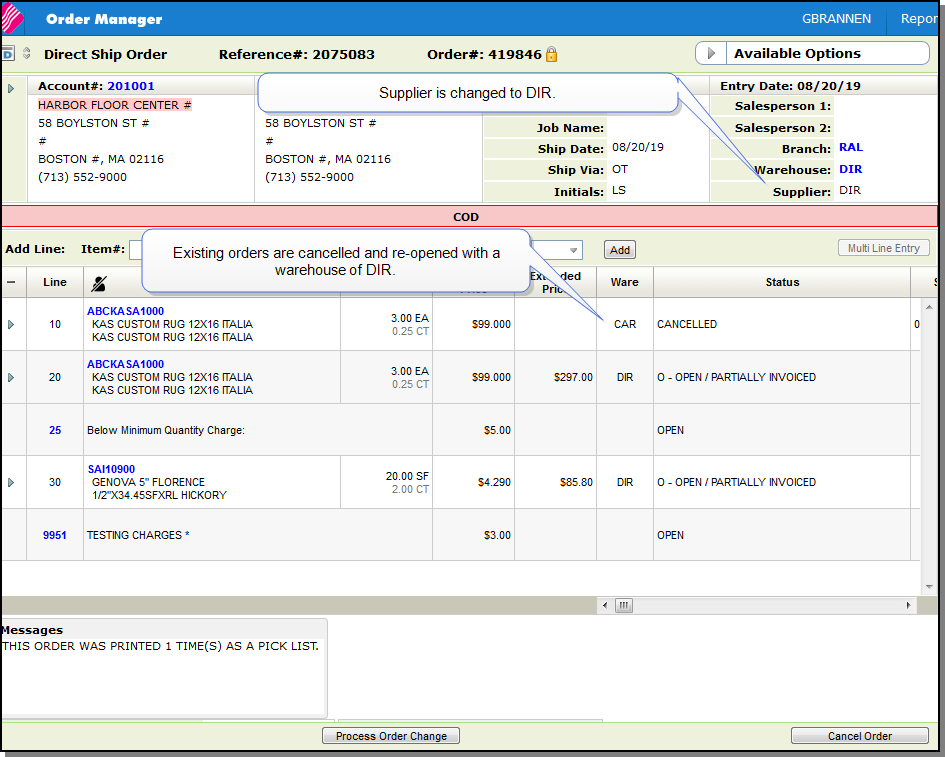
Entering DIR for a direct supplier does the following:
- The header warehouse is changed to DIR
- The order type is changed to D.
- Existing lines are cancelled.
- Each line is checked and updated against the new Pricing Method.
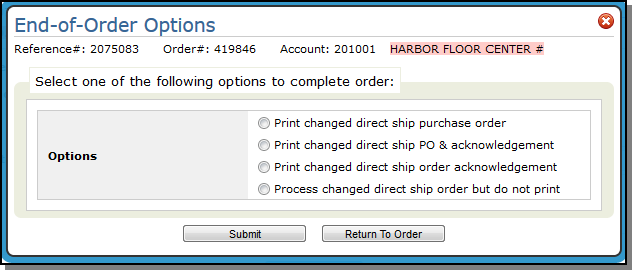
- The End-of-Order options are set to be for Directs.
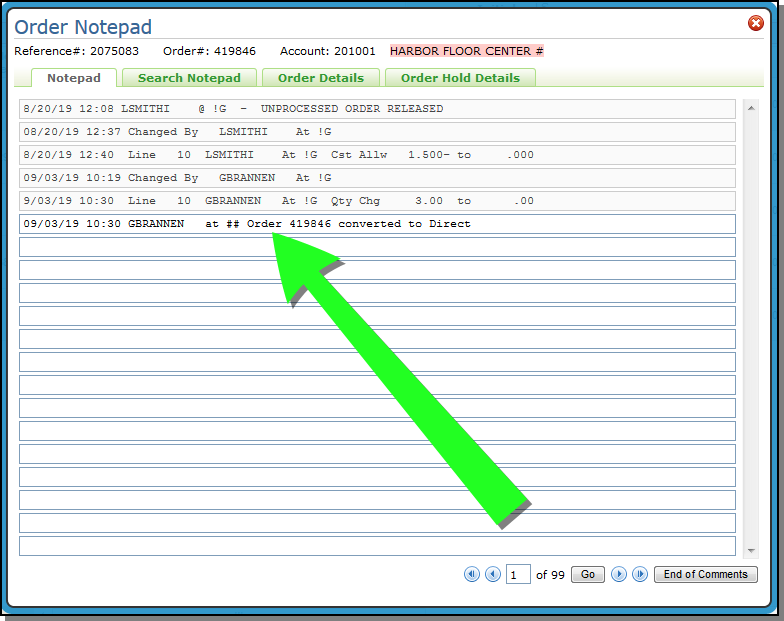
- An entry is made in the Notepad.
